|
TimeTechTalk.com > Time Tech Talk > Time Talk > Does anyone use a commercially available light box for photo's? |
|
TimeTechTalk.com > Time Tech Talk > Time Talk > Does anyone use a commercially available light box for photo's? |
| Welcome to 3T! Please take the time to register and join in on the friendly,knowledgeable watch talk.Please note that not all registrations will receive an immediate activation e-mail.Those who do not receive an immediate notification will be activated manually within 48hrs. by an admin. without an e-mail activation url sent to you,you may then sign in using your username and password,if you feel there is a problem please e-mail us at timetechtalk@hotmail.com and include your name and username and we activate your account.Thank You! |
| Moderated by: 3T | ||
| Author | Post | |||||||||
|---|---|---|---|---|---|---|---|---|---|---|
|
e.avery 3T WIS 
|
Does anyone use a commercially available light box for watch photo's? If you made your own, how did you make it? Photo's Welcome. |
|||||||||
|
Gregger 3T WIS 
|
Stolen from another forum......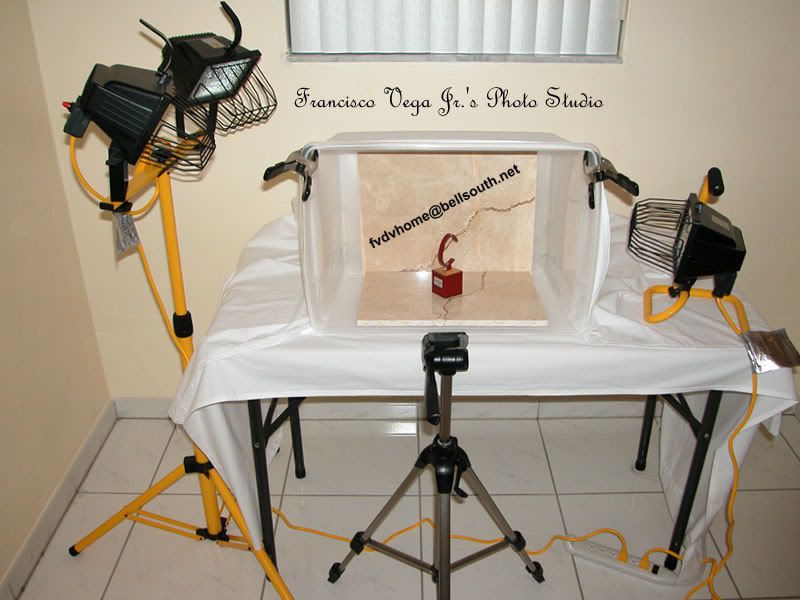 I plan to make the same one but just to much going on now!! |
|||||||||
|
eddiejack 3T WIS 
|
http://www.wolfcamera.com/product/302041835.htm Hi EA,Use this link to see the light box I use.Really enjoy it.EJ Last edited on Mon Oct 30th, 2006 06:52 pm by eddiejack |
|||||||||
|
pacifichrono 3T WIS 
|
Hey, Eric, here's my cheapo setup:
    |
|||||||||
|
Johnny P Advisor 
|
pacifichrono wrote: Hey, Eric, here's my cheapo setup: Tom that cheapo works greatsmile8.gif showoff. I know for a fact Francisco Vega took some awesome pictures when he was around WUS. I will be stealing a storage bin from my wife tomorrow.:D |
|||||||||
|
pacifichrono 3T WIS
|
Johnny P wrote:
I haven't seen Francisco in a long time. You're right...his shots were magnificent! |
|||||||||
|
e.avery 3T WIS
|
Those are all some great idea's and you all take realy great pic's, Thanks.:D |
|||||||||
|
Paxman 3T WIS 
|
And of course I've got the cheapo homeade setup as well. Very simply put I've got a frame made of PVC which I snap together. I drape this with sheets, light with a combo of incandescent and fluoroescent and there it is... Pax |
|||||||||
|
jakisbck 3T WIS 
|
If you want something really cheap go buy one of those styrefoam coolers from 7-11 or walmart, kamart , some cheapo store for $6 dont need alot of lighting either with this set-up. Here are some pics I've taken doing this when I dont really want too.      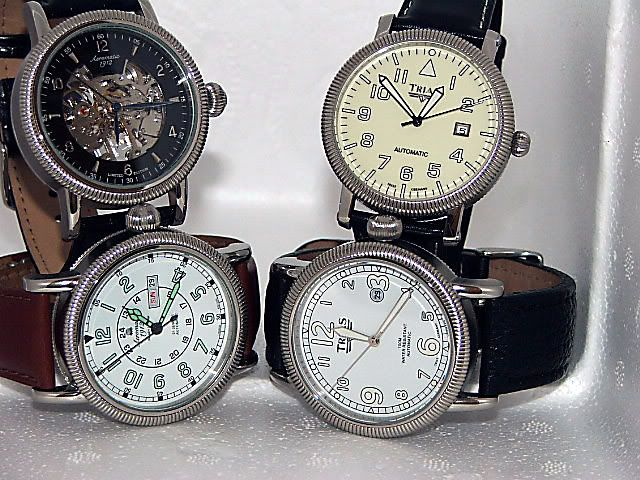  |
|||||||||
|
oagaspar Site Founder 
|
Found this nice project for the do-it-yourselfer.hand6.gif Foam Board You'll need 5 sheets of foam board, also called foam core or foam poster board. If you go to the local craft / art store you should be able to pick up large sheets for just a few dollars a piece. I have a huge box in my basement and the pieces were $4.99 a piece. The board used in this tutorial was $1.99 a piece (each piece is 30" x 20"). White Tape The tape I'm using is between 1" and 2" wide white masking tape. Stay away from duct tape, as the heat from the lamps makes the glue really messy. This masking tape is nice and lightweight and if you need to, you can take the tape off to re-adjust. Lamp / Light Bulbs I'm using shop lights from Home Depot / Lowe's. You can pick these up for just a few dollars a piece. Of course you can always use a flash and bounce it off the top of the box. I find that sometimes this is too much light and I get by pretty well with just the shop lights. I've tried all sorts of light bulbs. With your eye they may all look the same, the camera picks up different colors from different lights. The lights I'm using in this tutorial are Sylvania 100 watt Daylight Bulbs. It was $1.98 for 4 bulbs, not too shabby. Sometimes I like to experiment with a little hand held florescent light. It gives off a cool color which can be nice. That's about the extent of my knowledge on lighting so you'll have to experiment and find what works for you. Other You'll need a razor knife and a straight edge. 1. Attach the Top and Bottom Here is a quick sample of how I apply the tape. I know it's overkill to show this but I'd rather err on the side of being thorough.   2. Attach the Left and Right It may be hard to see how it will come together, but I just applied the left side (which is at the top of the photo below). Do the same for the right side.  3. Cut Off Overhang on the Sides Left: Shows the box with the overhang on left and right side. Middle: Shows using a straight edge to cut the excess. Right: Shows the box with the sides trimmed down.  4. Cut Notches in Sides This is something I just recently started doing. I found that I wasn't able to set the lights deep enough so cutting a notch in the side helps. You may have to skip this step and see the final deal, then you'll get the idea. The notches I cut were only a few inches deep, you could do more or less. Make it work for you.  5. Lights You can see I added a few more lights. The more the better in my opinion.  Showing the outside of the box.  Use this light box with a Flash. Here would be a sample illustration of how to use the flash with this setup. This works like a charm.  Optional Step You can apply a strip of tape to the back seam on the bottom. Apply it so the tape forms an even transition between the two pieces of foam core. Here is a quick and dirty illustration to show what I mean:  See What it Produces After literally 2 minutes with the light box and a few snaps later here is a shot I took of one of my lenses. Obvious improvements could be made here but this is just a quick image to show you how simple using this box can be.  But Wait, There's More Here is another trick I started doing. Sometimes I like to shoot the object from a top view. If you cut a hole in the top of the box, this is possible. Be careful not to cut too much, you'll want to score the part you don't cut, that makes it bend with ease.  Sample Photo Here is a sample of shooting a necklace through the hole I just cut in the top of the box.  Source: Joseph Holst | February 12th, 2006 | |   |
|||||||||
|
Johnny P Advisor
|
eddiejack wrote: http://www.wolfcamera.com/product/302041835.htm I didn't ask the original question but it sure helped me in deciding what to get. I want to thank everyone for there input, I'm new at this. Went with Eddiejack setup this is nice and portable, here are some quick shots.:) The only thing I bought extra was a mini tripod.     |
|||||||||
|
KenC Admin 
|
WHOA!!! All of that stuff is way to complicated for me!!!!  |
|||||||||
|
tny795 3T WIS 
|
I'm with you on this! Got an Excedrin headache just reading everyone's suggestions/directions. :) However, it's probably a lot faster to do than it takes to print it out step by step? :? However . . . KenC wrote: WHOA!!! All of that stuff is way to complicated for me!!!! |
|||||||||


